Red pepper and chilli jam is the sweet, sour and spicy condiment that you didn’t think you needed until you try it – then you’ll start having it with everything!
My recipe is based on a delicious version I originally ate at the now-defunct Jamie’s Italian restaurant chain.
I think it’s the best chilli jam you can make because :
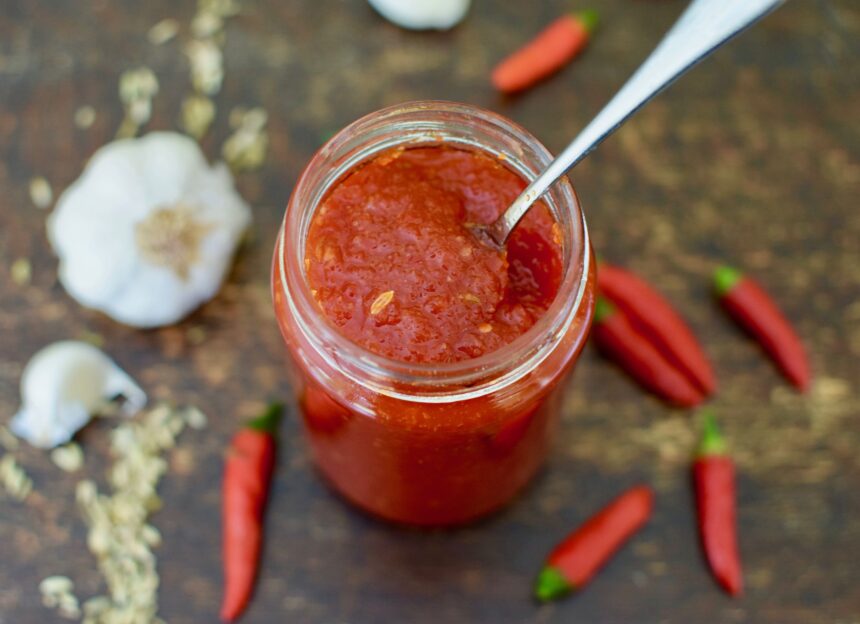
- It has a beautiful, thick rustic texture (you can see and taste the ingredients that went into it.
- It has a great sweet/sour balance, is generously packed with garlic, and has enough heat to keep you interested.
- It has the inspired addition of fennel seeds – as Jamie’s Italian showed me all those years ago, these give the jam an unmistakable flavour that I now can’t go without in my chilli jam.
This red pepper and chilli jam is also extremely versatile. It goes well with any salty Italian treats (think olives, cured meats, strong cheeses), you can eat it with your weekend fry-up, in a halloumi burger, or spread it on bubbling cheese on toast….as I said, once you learn how to make chilli jam you’ll start having it with everything!
I recommend batch cooking this red pepper and chilli jam recipe – a properly sealed and sterilised jar should last up to a year unopened.
You can jump straight to the recipe using the button below and I’ll show you how to make my red pepper and chilli jam.
Or, if you would like to read more, this article will guide you through:
- What inspired this recipe?
- What is chilli jam?
- What does chilli jam go with?
- Full cooking notes detailing how to make this red pepper and chilli jam – including how to sterlize jam jars, how to thicken the chilli jam, and a trick for telling if it’s ready.

What inspired this red pepper and chilli jam recipe? And what makes a good chilli jam?
It was love at first sight when I first tried chilli jam at one of Jamie Oliver’s restaurants in Cambridge.
Although those restaurants had various business-related problems and have now disappeared, the food itself was often outstanding – and this chilli jam was no exception.
The jam, which was served as part of an antipasti platter on crispy ‘music bread’, was beautifully thick and had a subtle but unmistakable Italian fragrance coming from whole fennel seeds.
Ever since I have struggled to find a chilli jam that lives up to this memory. I never succeeded – so I have decided to honour it through my own red pepper and chilli jam recipe!
Here are the factors that I think make this the best chilli jam I have tried:
- The thick texture – I don’t want a clear jelly, I want rustic, textured ‘jam’.
- The heat level – a lot of recipes I have tried have a disappointing amount of spice. I think you want a decent kick, especially as you tend to eat chilli jam in small amounts with other foods. This is why I use birdseye chillies; this is why I add five of them per jar!
- The balance of sweet and sour – to be chilli jam it has to be sweet and sour (as well as taste, the sugar and vinegar also help with the preservation), This one gets the balance just right, and is actually what makes the jam so moreish.
- The extra flavours – I have added fennel seeds because I think they take the jam to the next level. They also allow it to pair perfectly with so many Italian foods and cheeses. However, the base red pepper and chilli jam is really a blank canvas – you can add flavours that interest you.

The texture is really important when it comes to chilli jam – you want to see and taste the ingredients (smooth, transparent jellies are a no-no!). Also a handful of these fennel seeds packs a beautiful punch.
An aside – What is chilli jam?
From my experience, chilli jams tend to be a blend of two fruits: chillies and bell peppers (I think the general consensus is that without bell pepper your jam will be far too hot for anyone with a tongue).
These are stewed down with both sugar and vinegar until they become ‘jammy’.
The ‘jam’ in the name comes from the sugar. However most jams don’t tend to use vinegar as an additional preservative – this pushes chilli jam towards the realm of a pickle, or perhaps a relish. You could even argue that using both sugar and vinegar, plus spices (e.g. fennel seed) make this more of a chutney. However, the lack of any Indian origin would go against this.
In conclusion – Is it a jam? Is it a pickle? Is it a chutney? Who knows.
What does chilli jam go with?
I said that once you know how to make this red pepper and chilli jam you will start to have it was anything and everything!
Here are some ideas to get you going:
- Cheese on toast (or welsh rarebit – see photo below)
- Cheeseboard – you may be sensing a theme here… cheese is the natural partner for this red pepper and chilli jam. Just place the pot of jam alongside your next cheeseboard.
- A full English breakfast – I tend to eat mine with a tangy English mustard, but occasionally I switch to this tangy red pepper and chilli jam instead.
- Antipasto – any of the foods that typically form part of an Italian antipasti spread tend to go well with the jam – in fact this was where I first tried it! Cured meats, focaccia, hard cheeses, griddled courgette – you name it.
- On a burger – try a dollop of chilli jam and a couple of fresh mint leaves on your next halloumi burger: a great combo!
- With a pork pie – chilli jam + a Melton Mowbray pork pie – need I say anymore…
If you are looking to experiment with new pairings, as a rule of thumb I find that the sweet, sour and spicy jam tends to go well with rich, mellow things (hence the cheese obsession).
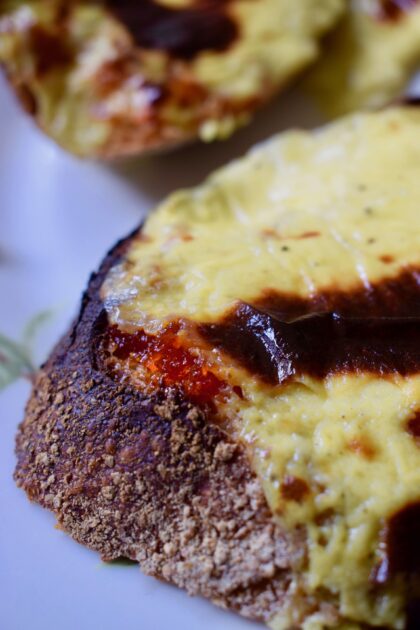
For me, a bubbling cheese on toast is the perfect pairing for this red pepper and chilli jam recipe. In this case I made a Welsh rarebit and spread the jam on the toast before adding the cheesy mixture. The rich, mellow flavours in the rarebit (egg yolk, cheese, beer etc) were the perfect foil to the jam.
Cooking notes
How to sterilize your jam jars
It’s important to sterlise the jars you use because it dramatically increases the shelf-life of your jam. With a properly sterlized jar, this red pepper and chilli jam can last anywhere up to a year if kept unopened in a cool dark place (although always give it a good inspection before tucking into an older jar).
There are two ways to sterlize your jars:
- With an oven – wash the jars and lids well with warm soapy water and rinse well. Then place the jars in a preheated oven at 160℃/gas mark 3/140℃ fan for 15 minutes. Submerge the lids in boiling water for the same time. Allow jars and lids to cool before filling with the red pepper and chilli jam.
- Without an oven – wash the jars and lids well with warm soapy water and rinse well. Then fill the inside of the jars with a sterilizer fluid (we have a common brand called Milton’s here in the UK – whatever you use to make sure you follow the dilution instructions on the back). Also submerge the lids in sterilizer fluid. Rinse both very well before filling with jam – you don’t want to taint the jam with any residue, it won’t taste great!
How to thicken chilli jam
In theory there are two stages to this red pepper and chilli jam recipe: blend your vegetables, then stew them down in a pan with sugar and vinegar.
The time-heavy step is waiting for your mixture to stew down enough so that it resembles jam, which requires a lot of water to evaporate from it.
In practice, adding a third step speeds up the whole process dramatically. Instead of boiling the mixture straight after blending, I prefer to sieve out the liquid and boil this first before adding back in the tasty pulp. Boiling the liquid without the pulp means that you can boil it down much, much faster (around 20-30 mins, as opposed to over an hour).
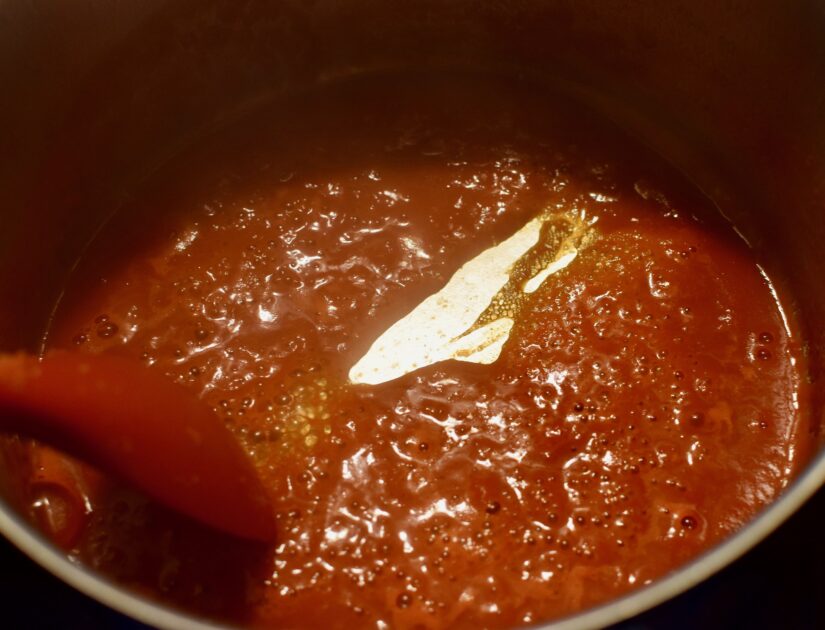
I recommend sieving the liquid from your blended mixture and boiling this first. Once it reaches this point (where it does not immediately flood the space left by a spoon dragged along the bottom), it is reduced enough for you to add the pulp back in.
Once you have added the pulp, sugar and vinegar back in, you simply continue boling the mixture until it reaches the desired jammy consistency.
How can you tell if it has reached a ‘jammy’ consistency? One trick is to place a plate in the freezer. When you think your jam might be ready, take it out and add a small blob. The plate will instantly cool the jam, making it resemble its final texture. Give it a try and see if it is thick enough for you!
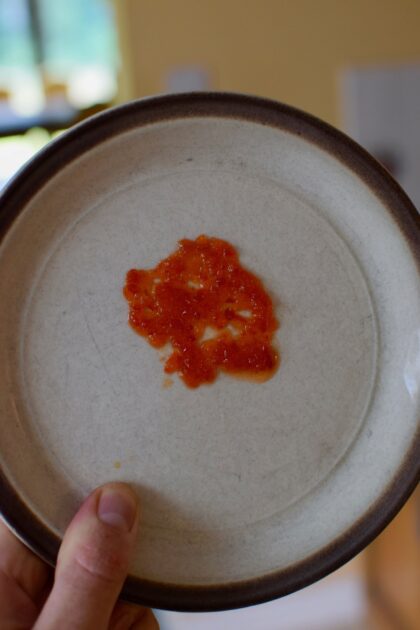
Testing to see if my red pepper and chilli jam is thick enough
One final tip when thickening the jam: keep an eye on it and stir more regularly for the final 10-15 minutes of cooking. The thicker it becomes the easier it is to catch it on the bottom. If this happens you can caramelise and/or burn the sugar, which I can tell you from experience does not improve the flavour of the chilli jam…

The Best Red Pepper and Chilli Jam
Ingredients
- 10 regular-sized red birdseye chillies *
- 4 red bell peppers
- 8 cloves of garlic
- Half a 400g can of chopped tomatoes
- 375 g caster sugar
- 125 ml cider vinegar
- 2 tsp fennel seeds
Instructions
- Place a small plate in the freezer (you will need this later to test the ‘jamminess’ of your jam).
- Blend the chillies (seeds in), peppers and garlic in a food processor until you have a fine, frothy paste – about 30 seconds. Add the tinned tomatoes to the mixture.
- Transfer everything to a sieve, allowing the sieved liquid to drop into a wide heavy-bottomed pan. Set aside the pulp for later.
- Bubble the sieved liquid over a medium-high heat until reduced to about a fifth of its original volume (this took me around 15 minutes). You can tell that it is ready when it does not immediately flood the space left by a spoon dragged along the bottom (see my photo for guidance).
- Add the reserved pulp back to the pan along with the sugar and cider vinegar. Bubble vigorously over a medium-high heat (it will look like bubbling lava), stirring every few minutes until it looks thick and ‘jammy’ – this took me around 30 minutes of bubbling. At this point the jam is ready. You can test it by placing a small blob on your frozen plate – this will instantly cool the jam, making it resemble its final texture. I like mine to be fairly thick.
- Take the jam off the heat and stir in the fennel seeds. Once the jam is cool enough to handle, divide between your sterilized jars and seal with the lids. If kept in a cool dark place the jars can last for up to a year (although always check before eating!). Once opened, keep in the fridge and use within a few weeks.